Blog

  • Project Setup

    The principal setup for the project is as follows:

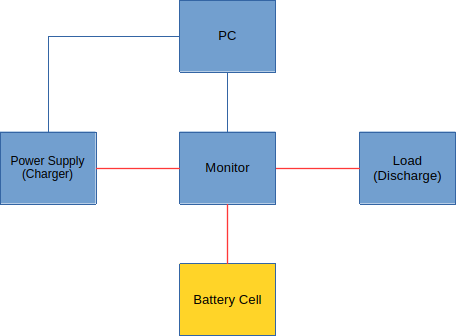
    The PC is used to record & control the experiments.

    The Charger is used to charge the battery.

    The Monitor is a box that records the charging process as well as the discharging process.

    The Load is used to discharge the battery.

    And finally the yellow box is the cell under testing.

    The requirements for the components are (roughly) as follows:

    Power Supply/Charger: If possible (budget!) it should be controllable from the PC. I.e. the PC should be able to set current and voltage maximums for a charge cycle. This could also be done manually as a work around if costs are prohibitive. It should be able to limit currents using increments of 10mA and voltages using increments of 100mV. An emergency switch-off input is preferable. Minimum voltage setting should be lower or equal to 1V. Maximum power should at least 1A.

    Monitor: Should be able to record voltages and current during charge and discharge cycles. The resolution should be better than 10mA and 10mV respectively. These measurements must be transmitted to the PC, or stored in internal memory for later transfer to the PC. Recording cell temperatures is desirable.

    Load: Preferably the load should be under control of the PC as well. But especially in the beginning a simple solution would be to use a power resistor mounted on a heat sink. Since only a single cell provides the power to be dissipated, this is not expected to exceed 1W in the initial phases of the project.

    PC: A Linux OS would be preferred, but the SW available for the charger and/or monitor will decide on which platform the PC will be run. Another option might be to use a controller like the Arduino, STM32 or Raspberry, but in that case the project would expand to include development of the test software. Possible, but it would cause delays in the project.

    At this point in time no component selection has been made. Hence it is possible that the project setup may change a little. Nevertheless, it is quite likely that the setup will resemble the above setup.

  • The project

    The main purpose of this project is to create a set of build instruction for a DIY NiFe battery.

    Any set of instruction will have a number of design parameters. Which will pertain to dimensions, materials and the performance that can be expected. The instructions should show how parameters changes will affect performance.

    The construction of prototypes will be done using a 3d printer. This will allow easy scaling and changing of dimensions while at the same time guaranteeing that the unaffected dimensions really stay the same.

    Testing will be done to establish relationships between parameter chances and battery performance.

    Tests should be repeatable and comparable. I.e. each test must be relatable to previous tests and show what the parameter changes resulted in.

    This will result in a lot of testing, and thus an automated testing setup will be highly desirable. At the very least data acquisition must be automated. But it would be advantageous to also automate the charging and discharging processes.

    Evaluation of the test results will be an ongoing concern, and will be used to control the direction of the project. While also allowing for some random testing (i.e. changing one or more parameters without a clear purpose just to prevent getting stuck in a dead-end development)

    The budget for the project is limited, its a hobby project after all. So especially in the beginning whatever is easily and cheaply available will be used.

  • Introduction

    The nickel-iron battery, or Edison battery, is a battery design that was developed around the year 1900. It has seen some use in that time and is still available today, though they are quite expensive. Possibly since there seems to be only a single manufacturer left in China.

    The NiFe battery is a low-tech battery. It cannot compete with the modern batteries if the purpose is power density, power per weight or cost per kWh. Nor is it very good in efficiency.

    So why bother? Well, it turns out that the NiFe is a very robust battery type that can last several decennia. NiFe batteries have been found after 50 years, and by simply cleaning them up and refilling with a new electrolyte they were good to go.

    And that is exactly why this type was chosen for this project. The aim is not to create “the best ever” or “most modern” kind of battery. The purpose is to create a battery that we can build ourselves and will last -with a little maintenance- a life time.

    Note: There are quite a number of modern improvements on this battery type and work is still continuing. However most of these developments will be ignored for this project as efficiency or energy density are not priorities.